|
'Server preferences' is where you go to configure the settings governing how the computer will be accessed from remote. Remember that this interface is only available when installing any of the NoMachine 'server' software packages. It is not available if you have installed Enterprise Client.
Once installed and running on the computer you want to access, you can reach the 'Server preferences' via the "!M" icon in the system tray of your computer by clicking 'Show the service status'. Alternatively you can access the Server Preferences via the 'Server preferences' link, visible at the bottom of the panel in all the images above.
If you have installed a 'server' product, the label 'Server preferences' will be visible instead.
For advanced users: See the following guide for more technical details, hints and troubleshooting regarding the various options available in the 'Server preferences' GUI, https://www.nomachine.com/DT10O00155
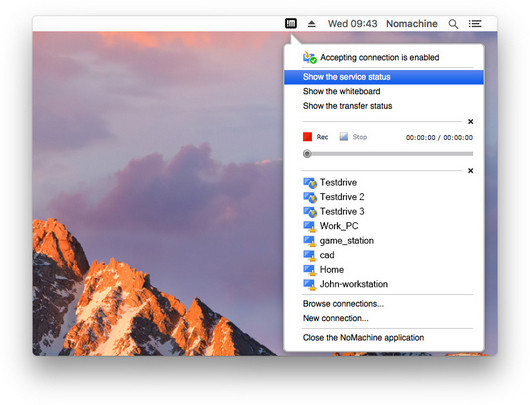
Fig. 8 - Click 'Show the service status' to access 'Server preferences'
Start automatic services at start up
If checked (enabled by default), the services present in the list will automatically start at every computer boot.
Advertize this computer on the network
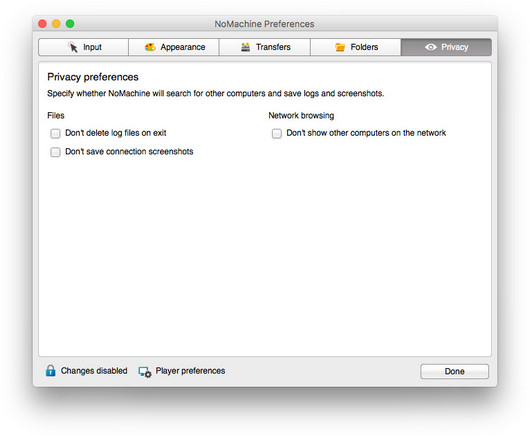
Enabled by default. Enable in order for the computer to show up in other users' connection lists when on LAN. Other users will see this computer provided they have not checked the box 'Don't show other computers on the network' (fig. 7). Disabling will stop the broadcast of computer's availability on LAN.
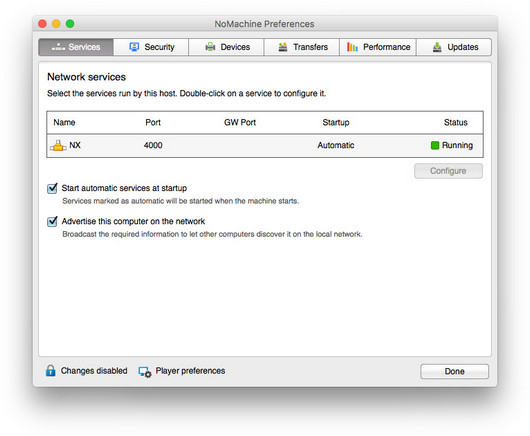
Fig. 9 - Show the service status > Server preferences
This area of 'Server preferences' allows you to set how you (and other users) can interact with your remote desktop.
Require permission to let remote users connect
Enabled by default. If someone is trying to connect to your desktop, a pop up message asking for your permission appears. If the computer is unattended, this option should be turned off.
Require permission to let remote users interact with the desktop
Disabled by default. Checking the box means that users will connect in view only mode. Interaction can be enabled at a later time by the owner.
Hide the NoMachine (!M) icon in the system tray
Disabled by default. Checking the box stops the !M icon from being displayed. Notifications will still be shown.
Use sound notifications when there is an event
If a user connects or requests to connect to the desktop, or a user disconnects, a sound will be emitted.
Blank the physical screen when somebody connects
Check the box to enable screen blanking and block mouse and keyboard input. Useful for unattended remote computers to p event others from entering data or viewing the monitor while you are remotely accessing it.
Lock the physical screen on disconnect
This option can be used in conjuction with the screen blanking: even when the last user didn't lock the screen before disconnecting by NoMachine, as soon as the screen is unblanked the system lock screen will be activated automatically to keep the remote desktop protected even if the computer is running unattended.
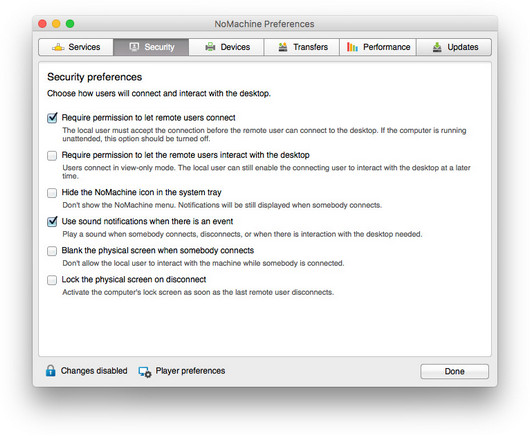
Fig. 10 - Security preferences
Choose to allow specific devices (printers, scanners, disks and more) to be shared to the connecting client, including audio and microphone, useful when VOIP application is being used.
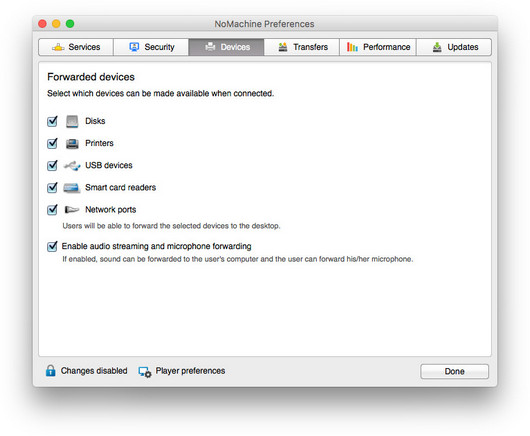
Fig. 11 - Enable which devices you want to make available on the remote desktop
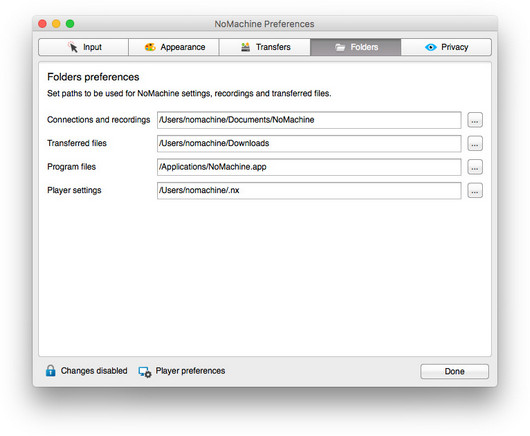
Configure whether connecting clients are allowed to upload and download files from the computer, set any size limitations and specify the location where files must be saved. Connecting client must have the 'Allow users to send you a file' box checked (see fig. 5).
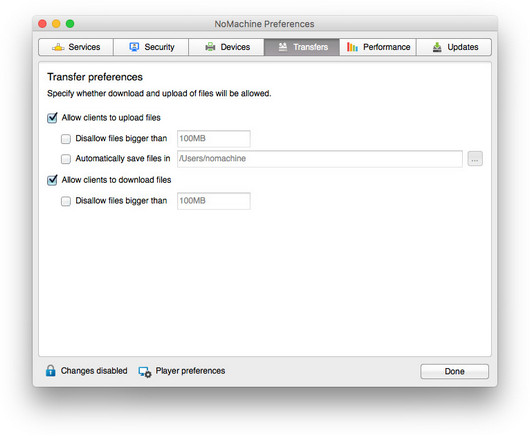
Fig. 12 - Transfer preferences
In the majority of cases, it won't be necessary to interfere with these settings since NoMachine will carry out the necessary checks and optimizations to give the best possible performance. The encoding method depends also on the decoding capabilities of the client. If the client supports H.264 decoding (by means of the hardware or by codec libraries), then H.264 will be chosen, otherwise VP8 encoding is always used. MJPEG won't be used unless it is explicitly requested.
Use a specific display encoding
Configure a specific type of encoding (server side), choosing from H.264, VP8 and MJPEG.
There are some cases where MJPEG might be more suitable such as when accessing a less powerful computer (legacy PC or computer with reduced CPU and RAM specifications). Selecting MJPEG will consume more bandwidth.
Request a specific frame rate
Select the frames-per-second that you prefer. Higher is recommended for activity such as game-playing.
Use acceleration for display processing
Applicable to Windows only with support for DirectX (OpenGL on Mac and Linux coming soon). If enabled the remote Windows server/host being accessed will capture the screen content using DirectX.
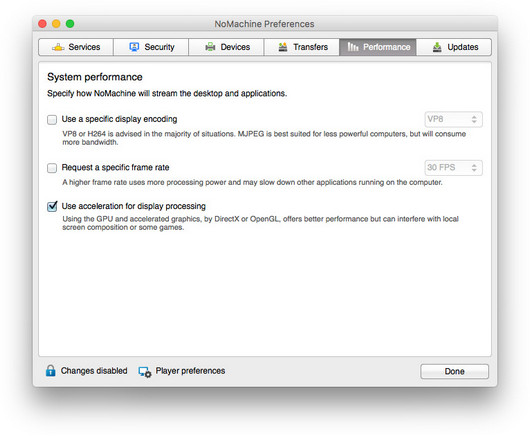
Fig. 13 - System performance
Here you will find information about the product installed and the license validity (if applicable). Additionally, enable automatic software updates. Leave unchecked if you prefer to do it manually. Updates are set by default to check NoMachine respositories every 2 days. You can override this by clicking 'Check now'.
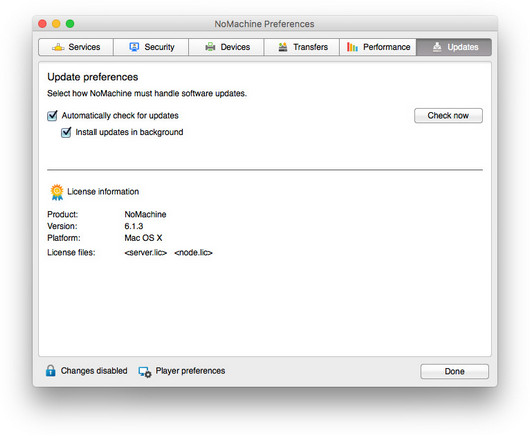
Fig. 14 - Update preferences
|