


How to connect over the internet to NoMachine behind a NAT router
This article applies to NoMachine 8 and later versions.
Every computer in a private network like that of your home or office is identified by an internal or private IP address. In most cases, the computer is behind a NAT (Network Address Translation) router which translates the internal IP addresses of computers in the local private network to a single IP address, accessible from outside that private network.
So, we need to distinguish two cases: (i) when connecting by NoMachine from the same network and (ii) when connecting from a different network like over the Internet.
1. Connect from the same private network
To accept connections from another device, the NoMachine service (nxd) on that computer listens on the internal port 4000 (this is a TCP port).
For example: computerA and computerB are in the same network at home or office. Their internal IPs are respectively:
computerA: 192.168.1.93
computerB: 192.168.1.94
To connect with NoMachine from computerA to -> computerB, set in the NoMachine connection:
IP 192.168.1.94 and port 4000
To connect from computerB to computerA, set:
IP 192.168.1.93 and port 4000
2. Connect from a different network (e.g. over the Internet)
Internal IPs and ports are not accessible from outside. So, if you need to access for example to computerA from outside, it's necessary to configure port forwarding on your router for that computer.
2.1. What is Port Forwarding?
Outside the private network, only the external (called also 'public') IP address assigned to the router is visible.
To allow NoMachine traffic to get from outside into your computer at home or office, it's necessary to map an external port to the internal port 4000. This is called 'port forwarding' or 'port mapping'. Port-forwarding is configured on the side that you want to connect to.
When you connect with NoMachine from an external device, set the external IP address + the external port in the connection set-up.
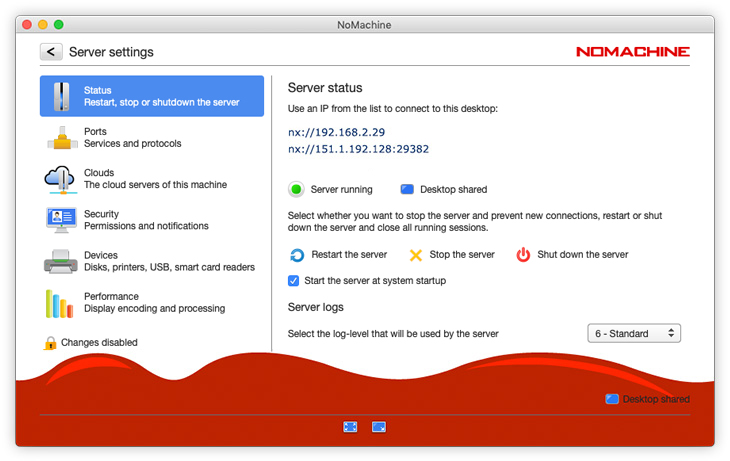
Let's say that the public IP of your router is 151.1.192.128 and the external port is 29382 and that your computer at home or office has internal IP 192.168.2.29.
When you connect with NoMachine to the host 151.1.192.128 and port 29382, the router needs to know where to forward the request for port 29382. I.e. port forwarding must have been configured on the router to send a request for external port 29382 to internal port 4000 on the computer which has internal IP 192.168.2.29.
NoMachine is able to try to do that automatically so that no further actions are needed, but this is not always possible. The router must support UPnP or NAT-PMP commands and needs to have port forwarding enabled. If these conditions are not met, automatic port forwarding will be not set.
Since v. 8 NoMachine automatic Port Forwarding is disabled by default for all server types, included NoMachine Free Edition.
2.2. Enabling the NoMachine UPnP/NAT-PMP automatic Port Forwarding via UI
To enable the automatic NoMachine UPnP/NAT-PMP port mapping to configure automatically your router, open the UI -> Settings -> Server -> Ports.
Select the NX service, click on Configure and provide the administrative credentials when requested:

In the new panel, select 'Gateway port' and 'Start mode' automatic.

The Gateway port is the port that a NoMachine client must use to connect to your computer.
When the automatic port forwarding completes successfully, the external IP and port are shown in the Welcome panel of the NoMachine UI:

and in the 'Server status' panel (click on the !M icon in the system tray to open it).
2.3. Troubleshooting
If the external IP and port don't appear in the UI, it means that the automatic port forwarding was not possible.
A message similar to the following, also indicates that port forwarding is not properly configured on the router:
A connection timeout has occurred while trying to connect to '151.1.192.128' on port '29382'
That means you have to configure the router manually.
2.4. How to configure the router manually through its administrative interface
Due to the great variety of routers, we can provide just some general guidelines and recommend you consult the official documentation of your router model for more details or to its support facilities for configuring it.
- Open the router admin panel by typing its internal IP address in a browser (also named as 'Default gateway').
- enter the 'port forwarding' section
- specify the Application Name (e.g. 'NoMachine')
- provide an external port that must be free
- specify the internal IP of the computer where NoMachine is running
- specify port 4000.
- select “TCP/UDP” or “Both” as protocol.
For example:
| Application Name | External Port | Internal port | To IP address | Protocol |
| NoMachine | 29383 | 4000 | 192.168.1.93 | both |
If you want to access also computerB from outside, configure port forwarding for it as well (external port mut be different!):
| Application Name | External Port | Internal port | To IP address | Protocol |
| NoMachine | 29384 | 4000 | 192.168.1.94 | both |
IMPORTANT
1) UPnP or NAT-PMP protocol must be enabled in the router.
2) Port forwarding must be enabled on the router.
3) The public IP of the router should be static (contact your IT provide for options). If IP is not static, you could use a DynDns service to auto update your dynamic IP, if the router or the provider allows to install a dynsys client on your machine and keep it up-to-date.
4) Preferably, try to use external port numbers in the range of 1024-65535.
Check if the port is free, it should not be already in the port forwarding list!
Do not use port numbers in the range of 0-1023 to avoid possible conflicts with other applications. These TCP/UDP port numbers are named as 'well-known ports' and used officially by specific programs, for example port 80 is used by default by web servers.
TIP
Once you configured the router, take a note of the external IP address of the router and the external port number: you will need them to connect by NoMachine from another device.
3. Troubleshooting for most common cases requiring manual configuration of the router
Case 1: The router doesn't support UPnP or NAT-PMP protocol
Solution: map an external port or a port-range to the local (internal) IP and port 4000
Case 2: Port forwarding is disabled on the router
Solution: enable port forwarding on the router and restart NoMachine
Case 3: Double-NAT router
Solution: port forwarding must be configured manually on both routers
Case 4: More computers are behind the same NAT router
Solution: if each computer is independent and needs to be accessed from outside, an external port should be mapped for each of them. E.g.
| Application Name | External IP | External Port | Internal port | To IP address | Protocol |
| NoMachine | 212.10.10.2 | 24001 | 4000 | 192.168.1.1 | both |
| NoMachine | 212.10.10.2 | 24002 | 4000 | 192.168.1.2 | both |
| NoMachine | 212.10.10.2 | 24003 | 4000 | 192.168.1.3 | both |
| --- | --- | --- | --- | --- | |
| NoMachine | 212.10.10.2 | 240010 | 4000 | 192.168.1.12 | both |
Other possible cases:
Case 5: Port 4000 is already used by another application
Solution: change the port for connections by NX protocol via the NoMachine UI: open the Server -> Setings -> Ports panel, select the nxd service and click on Configure. Set a new value for the Service port, which is by default 4000.
Case 6:Automatic port forwarding is disabled in the NoMachine configuration
Solution: see par. 2.2. for instructions.
4.1. For commercial servers and NoMachine Free Edition
Since v. 8, NoMachine UPnP/NAT-PMP automatic port mapping is disabled by default for all server types, including NoMachine Free Edition.
Commercial versions of NoMachine servers use the following TCP ports:
4000 for connections by NX protocol
22 for connections by SSH protocol on Linux and macOS
4022 for connections by SSH protocol on Windows
4443 for web connections by HTTPS
NoMachine Free Edition uses only:
4000 for connections by NX protocol
4.2. Enabling NoMachine UPnP/NAT-PMP Port Forwarding via configuration
Edit the server configuration file (server.cfg) and set:
EnableFirewallConfiguration 1 (default)
EnableUPnP NXTCP,NXUDP,SSH,HTTP
It can be enabled also for a specific connection type only, e.g. for connections by NX protocol (this is the only value valid for NoMachine Free Edition):
EnableUPnP NXTCP,NXUDP
or by SSH protocol:
EnableUPnP SSH
or by the web:
EnableUPnP HTTP
Restart NoMachine via UI or from command line.
NOTES
1) It's also possible to manually assign an external port to be used for configuring the router for port forwarding:
NXTCPUPnPPort "24001"
NXUDPUPnPPort "24001"
SSHUPnPPort "24002"
HTTPUPnPPort "24003"
These ports must be free and not already in use on the router.
2) NoMachine free uses only the NX protocol, set:
EnableUPnP NXTCP,NXUDP
and to assign a specific port, set for example:
NXTCPUPnPPort "24001"
NXUDPUPnPPort "24001"
Executing NoMachine UPnP/NAT-PMP Port Forwarding manually
1) Retrieve information about UPnP Port Forwarding, on Linux and macOS:
$ sudo /etc/NX/nxserver --upnpstatus
on Windows:
> %ALLUSERSPROFILE%\NoMachine\nxserver\nxserver.exe --upnpstatus
2) Execute UPnP Port Forwarding, on Linux and macOS:
$ sudo /etc/NX/nxserver --upnpmap
on Windows:
> %ALLUSERSPROFILE%\NoMachine\nxserver\nxserver.exe --upnpmap
3) Terminate UPnP Port Forwarding, on on Linux and macOS:
$ sudo /etc/NX/nxserver --upnpunmap
on Windows:
> %ALLUSERSPROFILE%\NoMachine\nxserver\nxserver.exe --upnpunmap